Build A Bear Frog Heart Cardigan
- Create Valentine
- Apr 9, 2022
- 2 min read

Updated: Apr 10, 2022

This turned out so cute and I love it so much. I can't really say I wrote the pattern for this, more like I combined other people's patterns but here is how I made it along with credits to everyone whose patterns I used or took inspiration from. If you make something similar, be sure to tag me @Create.Valentine over on Instagram and TikTok :)https://www.instagram.com/p/CcK874zLOyR/
I honestly love making clothes for my Build A Bear because it comes with all the fun of making wearables but without as big of a time commitment.
Inspiration

The idea for this came initially came from a cardigan by SunOutfits that I saw on Pinterest. I've seen several similar cardigans with heart shape granny squares and knew I wanted to make one for my Build A Bear frog.
After that, I looked for a small heart granny square pattern. I found this one that was uploaded by Daniel Julieta on Pinterest. I found that it was the perfect size for what I wanted though it took me a few attempts to get right.
From there, I used the same layout as the time I made a version of Harry Style's cardigan for my BAB frog. Used this incredible tutorial by Woolly Wumpkins (go check them out if you haven't, they are so talented).
Making the Cardigan

I thought the granny square heart pattern was perfect but I hadn't used diagram patterns like this before so made quite a few mistakes before realising I was reading the pattern wrong (I wasn't adding CH stitches between the stitches in the heart so they were coming out wonky - worked it out in the end though!). I used a 3.5 mm hook and velvet yarn. Each of my squares came out about 5 cm x 5 cm but I'm not the most consistent. Also tried out a few colour combinations before working out I wanted a checker pattern where some were dark pink in the centre and some were light.

I made 28 squares in total (14 with dark centres and 14 dark centres) and arranged them in the same shape as in Wooly Wumpkin's pattern with the correct side agast the table and the backside facing me. So that all the hearts would be oriented correctly, half of the hearts I placed with the point towards me and half away from me (see my diagram).
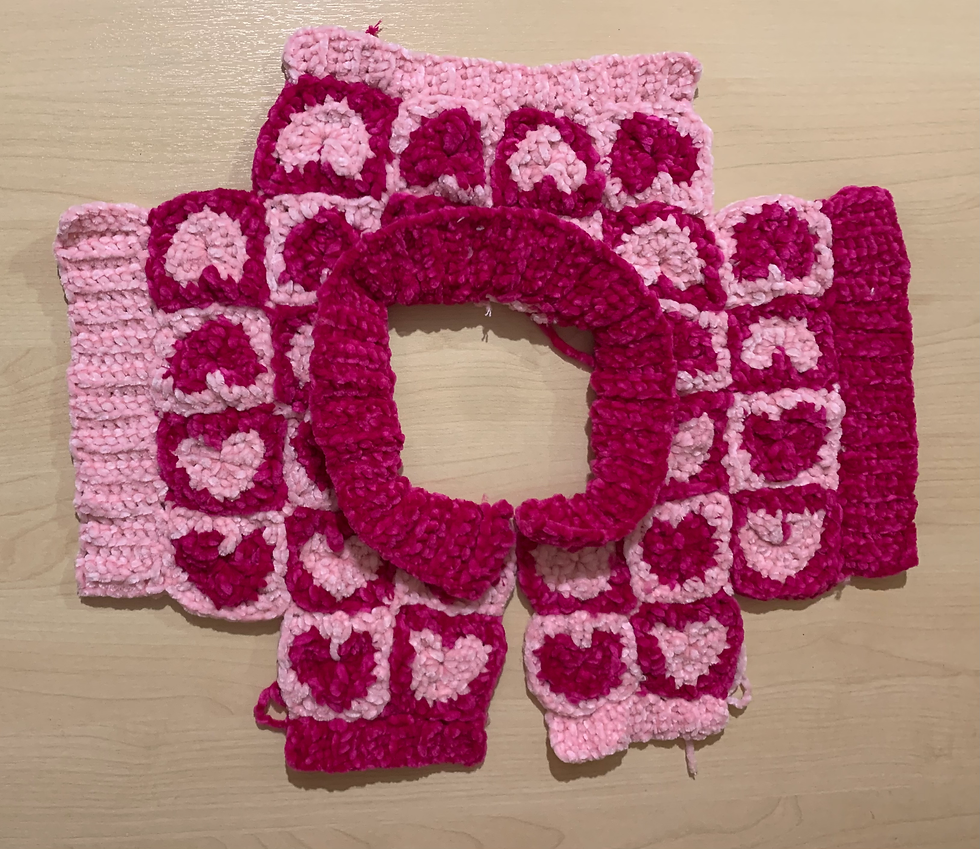
From there I pinned it all together and used a mattress stitch to join the squares. For the "ribbing" I again followed Wooly Wumpkin's tutorial and joined it with a mattress stitch. I learned from my mistakes making the Harry Styles cardigan and make sure to clean up the ends of all my squares before sewing. I had a huge mess of tangles last time.


Finished Object
I am honestly so happy with how this turned out. It felt super cool to have an idea in my head and slowly start seeing it come together (and I am sure Finn is very happy with it too).


Comments