Search Results
5 results found with an empty search
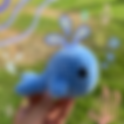
- Adorable Blue Whale!
For this adorable sea creature, I used this pattern by Rose and Lily. It was super easy to follow and came together really quickly. I was using a light Blue velvet yarn with a 3.5 mm Hook and the whale ended up being (length) cm long with this super cute shape. I didn't take any progress pics as I was making this because it was just something I was doing to kill time while on the move. Took me maybe an hour or so in total and it is literally adorable. My whale generally came out kinda wonky but I think that’s mainly because I was not using a stitch marker (not to mention I'm terrible at counting. The eyes on mine are definitely a little too far apart so maybe follow the directions on where to place them and don't be like me and try to guesstimate it haha. The pattern was well written and I'm really happy with how this little guy turned out.
- Mood blanket - I'm Gonna Giving Up
I started a mood blanket for 2022 with a base chain of 151 and I've honestly been loving it. To me, there is something so poetic about the mood blanket, crocheting a row every single day where the colour is dependent on my main mood that day. My mental health can, at times, leave me feeling so alone and cold. There is something powerful in then taking that and turning it into something to give me warmth and comfort. I also really loved being able to see the patterns in my mood. Another big thing for me is taking that 15 minutes a day to unwind and crochet before I sleep. I am so guilty of staying on my phone until suddenly it's 3 am so doing the row a day really acted as a way of basically telling myself "After this, it's bedtime." It really gave me a place to unwind (pun intended) and reflect on my day. So if I loved it so much... Why am I quitting halfway through the year? Welp, I have a confession, I have pretty much not worked on the blanket since May. The first week of June was hectic for me as I had an exam every day and then I ran out of the right colour and then school holidays started and I fell out of my routine and I just never really recovered. The thing about a project like this is that once you fall behind its so hard to get back into it. It's also hard to travel with the project because of all the colours needed at its size. It's honestly disappointing to me because I really thought I could be part of the tiny minority that actually finished one of these things. It's honestly already big enough to be a decent size single blanket so my plan now is to finish it off here and then start a new one when school picks up again. Stay tuned for that! I'm thinking of making things easier by maybe doing something like squares that are easier to travel with.
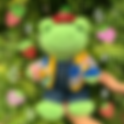
- Mini strawberry hat for Build A Bears
If you know me, then you know I love my build a bear frog to the moon and back. However, one of the issues I've found with the BAB frogs is that the normal BAB hats (anything over the head really) don’t look great on them because of their eyes. This is why I wanted to make a mini hat just for my frog (Finn). Especially after some encouragement (demands) from my friends (Hi, Claire. If you’re reading this btw). This hat is honestly adorable and super easy to make. Only took maybe an hour or two to put together and can probably be finished in just over an hour without sewing the seeds. I’m so happy with how this came out. This is also one of my first times writing a pattern so please let me know if you find any mistakes or have any questions! Pattern Notes: I stuffed the hat on mine and then sewed the bottom but this is completely optional. Since it's more sitting on top of the head than the head being inside like a normal hat I thought this gave the hat a better shape and made it look better. I also tied two long strings to the sides of my hat so I could tie it to my build a bear (didn't want it falling off). Materials: 3.5 mm crochet hook Red yarn Green yarn Scrap white/light yellow yarn Key: MR - Magic Ring SC - Single Crochet INC - increase (two SC in a single stitch) FLO - Front Loop Only Main hat (red) Finish, leave short tail Bottom of hat (red) (optional if you want to stuff hat) Stem (Green) Assembly Using white scrap yarn, sew white “seeds” around the hat. (See pictures) Sew the base of the stem to the top of the body of the hat. Optional: Stuff the main body of hat, sew the bottom of the hat around the base of the inside of the hat. This can keep the shape looking better when being worn. Optional: tie long strands of yarn to the bottom of the hat to be able to tie the hat to the bear. Use a colour that will blend with their fun (e.g green for sping green frog)
- Build A Bear Frog Heart Cardigan
This turned out so cute and I love it so much. I can't really say I wrote the pattern for this, more like I combined other people's patterns but here is how I made it along with credits to everyone whose patterns I used or took inspiration from. If you make something similar, be sure to tag me @Create.Valentine over on Instagram and TikTok :)https://www.instagram.com/p/CcK874zLOyR/ I honestly love making clothes for my Build A Bear because it comes with all the fun of making wearables but without as big of a time commitment. Inspiration The idea for this came initially came from a cardigan by SunOutfits that I saw on Pinterest. I've seen several similar cardigans with heart shape granny squares and knew I wanted to make one for my Build A Bear frog. After that, I looked for a small heart granny square pattern. I found this one that was uploaded by Daniel Julieta on Pinterest. I found that it was the perfect size for what I wanted though it took me a few attempts to get right. From there, I used the same layout as the time I made a version of Harry Style's cardigan for my BAB frog. Used this incredible tutorial by Woolly Wumpkins (go check them out if you haven't, they are so talented). Making the Cardigan I thought the granny square heart pattern was perfect but I hadn't used diagram patterns like this before so made quite a few mistakes before realising I was reading the pattern wrong (I wasn't adding CH stitches between the stitches in the heart so they were coming out wonky - worked it out in the end though!). I used a 3.5 mm hook and velvet yarn. Each of my squares came out about 5 cm x 5 cm but I'm not the most consistent. Also tried out a few colour combinations before working out I wanted a checker pattern where some were dark pink in the centre and some were light. I made 28 squares in total (14 with dark centres and 14 dark centres) and arranged them in the same shape as in Wooly Wumpkin's pattern with the correct side agast the table and the backside facing me. So that all the hearts would be oriented correctly, half of the hearts I placed with the point towards me and half away from me (see my diagram). From there I pinned it all together and used a mattress stitch to join the squares. For the "ribbing" I again followed Wooly Wumpkin's tutorial and joined it with a mattress stitch. I learned from my mistakes making the Harry Styles cardigan and make sure to clean up the ends of all my squares before sewing. I had a huge mess of tangles last time. Finished Object I am honestly so happy with how this turned out. It felt super cool to have an idea in my head and slowly start seeing it come together (and I am sure Finn is very happy with it too).
- Why I learned to Crochet
Hey there! this is a little test post/intro about me and crochet. I am by no means a crochet expert - I am fully aware of that. I would consider myself your average crocheter, full of passion and has probably a little too much yarn in the stash. I first picked up crochet when I was 8 (look over to the side to see my first"scarf" that was far too thin to keep anything warm) and continued with that for a couple more years. It may sound geeky but a few of my other friends at the time also learned so we would sit in the playground under the summer heat with our balls of yarn. It was fun for a while but I gotta admit I left my hooks and yarn forgotten in the back of my closet for years after that. Fast forward to 2020, covid lockdown hit and I found myself with extra time on my hands and recently switched school. Imagine you are me, just arrived at a new school, boarding for the first time, just to find that school have been closed and you're stuck in the boarding house with people you barely know. After seeing crochet bees all over my TikTok for you page I got reminded about my old passion and wanted to pick it up again (Yes, I did follow suit and use Hooked By Robin's viral bee pattern). Crochet gave me something familiar when everything around me felt different and uncertain. Since then, crochet has continued to be something I use for when I feel like I need "me" time or to decompress. I love the repetitiveness yet creativity that goes into a project and theres few things that are more satisfying than seeing the fruits of your labour come together at the end.